


|
|
|
|
It is universally agreed in the baseball world that good pitching is the name of the game. "Good Pitching Beats Good Hitting" is an accepted baseball absolute. Some experts have estimated that pitching is 80% of the game. If we believe this to be true, then I ask: "What percentage of our practice time do we devote to pitching?" 80%....50%....25%? It is an aspect of the game that we can all agree is crucial, but is sadly undercoached. The following will be helpful in instructing young pitchers. These are simple, time-tested strategies and drills that will hopefully be incorporated into your team practices. Warm up to Throw. Don't Throw to Warm Up! It is very important to allow all your players the opportunity to stretch and loosen up before allowing them to play catch. This is especially critical in the cold weather of March and April. Five minutes of baseball-specific exercise will get the blood flowing and help protect the arm and shoulder Wind-Up and Delivery With young (and even high school) pitchers, we try to break the pitching motion down to 5 steps. Youth league coaches often shy away from coaching pitchers, often citing a lack of knowledge. Keep it simple. Have your pitchers constantly repeat the 5 steps and you'll have a frame of reference and understanding, along with teaching cues to use; rather than yelling tired phrases such as "bend your back," "follow through" and "hey, throw a strike and let them hit it." The 5 Steps of Pitching 1. Baby Rocker Step (4-6 inches) 2. The Pivot 3. Balance Point 4. Stride and Release 5. Follow Through (Extend to plate, finish low)
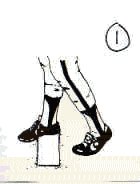
Step 1: Baby Rocker Step Step 1: 4 - 6 inches Step 2: The Pivot
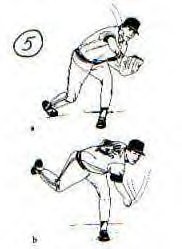
Step 3: Balance Point Step 4: Stride and Release
Step 5: Follow Through (Extend to plate, Finish Low)
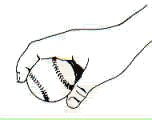
The Stretch Position Some pitchers may feel uncomfortable using the 5 steps. In youth leagues, children may lack the strength, balance and coordination to master the proper wind-up, pivot and delivery. If your pitcher has difficulty mastering the 5 steps, I suggest the stretch position. Set the pitcher up on the rubber, feet spread shoulder width apart, with their front shoulder facing home plate. Have the pitcher raise his hands, while bringing his front foot back to the rubber. When the pitcher has come set, he strides toward the plate and delivers the pitch. What we have done is to eliminate steps 1 & 2. We have reduced the delivery to a 3-step process. Keep it simple! With fewer components to the delivery, there is less chance for breakdowns and mistakes. Consider that today there are increasing numbers of major league relievers who never pitch from a wind-up and go exclusively from the stretch. Grips I recommend that Little League pitchers be taught two pitches: the fastball and change-up. The 4-seam fastball is held with the index and middle fingers across the horseshoe of the baseball. The ball should be held out on the tips of the fingers with the thumb placed on the bottom of the ball. Keep the ball out of the palm of the hand. The 4-seamer is the pitch that can be thrown with the greatest velocity. The backward spin created when the pitch is released provides a true and accurate path. It is considered the easiest pitch to control. It is for this reason that the 4-seam grip is taught to every defensive player, due to its' accuracy
THROW FASTBALLS! Fastballs develop arm strength by building arm muscles. You get stronger through exercise. The fastball is the easiest pitch to control; hence a pitcher throws more strikes. Throwing strikes is the name of the game.
THE PITCHING GAME ... Some things to consider:** Any ball hit to the right side of the infield requires the pitcher to break to cover 1st automatically.** Whenever a runner is on third base, it is the pitcher's responsibility to cover home on any ball that goes by the catcher. (If you've watched enough games in Little League, you realize that this is the main source of run production.)** Field bunts and comebackers. Never barehand the ball unless it has come to a complete stop.There you have it. I've scratched the surface of the pitching game but you are now "armed" with info to impart to your hurlers. |